Wednesday, November 30, 2011

David Hagerman: The Ferry Boats of Istanbul

Photo © David Hagerman-All Rights Reserved
David Hagerman attended The Foundry Photojournalism Workshop in Istanbul and produced an evocative audio slideshow titled The Ferry Boats of Istanbul, which he just published on his blog.

Yes, Istanbul is the city of Sultanahmet Camii, the Aya Sofya, the Kapalı Çarşı, but it's also the Bosphorus ferries that characterize it. These ferries provide vital links between different areas of that magnificent city, connecting the European and the Asian coastline. The first steam ferries appeared on the Bosphorus in 1837, were operated by private sector companies and currently carry approximately 61 million passengers yearly.

It is these that Dave decided to document. The audio slideshow with its glowing images and ambient sound will transport you in such ferries...the sound of the turnstiles, the sirens, the voices of the passengers, and even the clink of the spoon in tea glasses that are served on ferries...all ambient sound intelligently selected to provide a complete visual and aural experience of these Istanbuli fixtures.

David Hagerman is a photographer based in Kuala Lumpur and Penang in Malaysia, whose work has appeared in publications such as The New York Times, The Wall Street Journal Asia, Saveur, Budget Travel, Travel & Leisure SEA, The Chicago Tribune, South China Morning Post, Time Out KL, and Lonely Planet guidebooks. His work is also featured on the very popular Eating Asia blog.

Russell Green River Hunter Knife Review

The Green River knives have been in use by outdoorsmen since the 1800s. They gained popularity because they were affordable, mass produced knives, which got the job done.

hjuk (11)

Specifications:
Knife Length: 9 inches (229 mm)
Blade Length: 5 inches (129mm)
Blade Thickness: 3/32 inches (2 mm)
Blade Width: 1 1/4 inches (28 mm) at the widest point
Blade Material: 1095 carbon steel
Blade Hardness: Unknown
Type of Tang: Full
Blade Grind: Full flat grind with a secondary bevel
Handle Material: Wood
Sheath Material: No sheath
Cost: $20.00

089

The knife is fairly cheap, although there are lower cost knives on the market. It is certainly not the bargain basement price it had in the past, which contributed to its popularity.

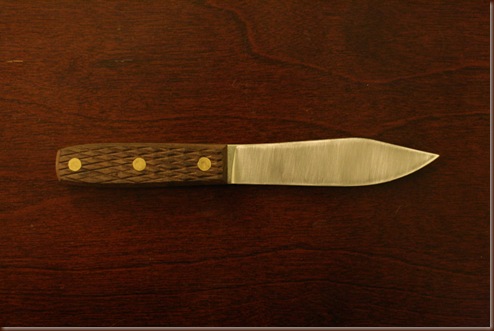
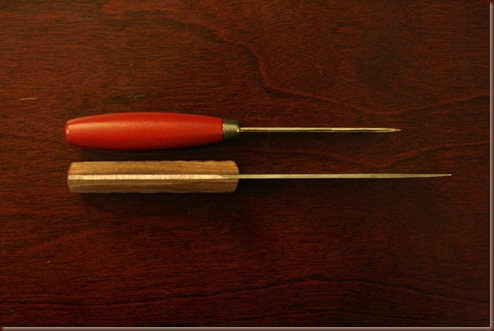
When compared to a Mora #1, it is clear to see that it is a larger knife, with the blade being over an inch longer and significantly wider. In thickness however, the two blades are about the same. The handles are the same length, but because the Green River handle is more rectangular, it feels thicker, although I don’t find it as comfortable as that of the Mora. The knife overall has the feel of a kitchen knife, although a bit thicker. Unlike the Mora, the Green River has a secondary bevel. The knife was not sharp when I got it, so I had to spend some time with the sharpening stone before testing.

hjuk (17)

hjuk (31)

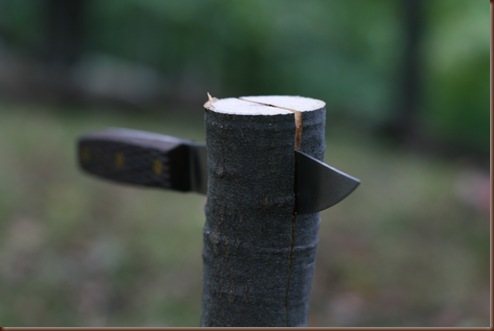
The knife performed well when batoning. The blade is fairly thin, so it is not good at separating the wood fibers, but in turn it goes through the wood easily.

105

Similarly, the knife performed well when truncating. The blade feels thin, and the knife has a tendency to bend, unlike that of the Mora, despite the similar thickness, but it held up very well through all of the tasks.

110

I was not able to make any good feather sticks with this knife. I am sure the fault lies with me and my lack of practice with this design, but for one reason or another, I was just not able to get a feather stick going.

The knife does not come with a sheath.

Overall the knife is not bad. For a five inch blade, it does what it is supposed to. Keep in mind that the blade is not particularly thick, so it is best suited for cutting tasks, rather than batoning and other heavier work. In those areas it will easily get outperformed by a more robust knife with a five inch blade like the Fallkniven S1. My issue with the knife however is not that it is not adequate, but rather that in my opinion it falls short when compared to the Mora. It costs almost twice as much as a Mora #1 or a Mora #2, but I do not believe it does any more work for that money. In fact, I find the basic Mora knives more comfortable to fold and use, and for some reason they feel more solid. If I had a choice between a Mora #1 and a Green River Hunter knife, I would certainly chose the Mora. 

Jamie's Italian, Brighton

Great food at good prices, great ambience and a funky interior - happy:) We arrived at 12 noon before any customers arrived to take a few photographs, hence no customers! Shortly afterwards the place was full to overflowing!


Tuesday, November 29, 2011

Cupcake Homeware - Store Twenty One


Store Twenty One have lots of ideas for presents and Christmas gifts for cupcake lovers! They have kindly sent me a selection of cupcake goodies to satisfy all of my cupcake needs including a Cake Slice Money Box, Cupcake Spoon Rest, Cupcake Salt and Pepper Pot and Cupcake Mug with Lid.


3 Tier Cupcake Stand holds 13 cupcakes and is designed to show off your creations at their best. The stand comes ready for easy assemble and after use will easily dismantle for storage.

The Giant Cupcake Mould is made from non-stick flexible silicone. These are very popular and you can let your imagination run wild decorating one of these huge cupcakes.

Cupcake Clock will appeal to all cupcake lovers!

Cute Cupcake Doorstop in pink.

The brand: Store Twenty One is a value clothing and lifestyle products retailer selling great value fashion clothing and homewares for the entire family through over 200 stores over the UK.

Standard Delivery(UK) is 2-4 working days, delivery costs and returns policy can be found here, and once you have placed your order you will be able to track its progress.

Thank you Louisa and Store Twenty One

POV: Moises Saman And Cairo Undone

Photo © Moises Saman-All Rights Reserved  
How wrong I was! I always dismissed the idea of photographing street life in Cairo by saying that there was nothing to photograph there...not much color, no vibrancy....but that began to change after the January Revolution. Was it a subconscious rejection of the then-prevailing environment? Or simply because I was blase about photographing in my own backyard...albeit one that I left for more than 30 years? Was it both? Perhaps.

That admission being made, I have to clarify that I speak only of street life rather than particular cultural subject matters, such as documenting Sufi rituals such as those I photographed a few years ago.

What changed my mind is the brilliant photo essay in The New York Times titled Cairo Undone by Moises Saman.  The photo essay (it's really a gallery as there's no storyline nor timeline) is of snapshots (I use this term very respectfully) of daily life in Cairo...the gritty, the edgy, the incomprehensible, the political and the anachronisms that dominate this teeming city.

I intended to post this as soon as I saw the photographs, but I was in Siem Reap and just couldn't find the time. I have viewed and re-viewed this work many times, and it revived in me a hunger to document facets of this city. Is it a nostalgic yearning? I doubt it...I don't think that way. It's similar to my documenting the Sufi rituals in various countries...that is nothing more than an intellectual and aesthetic pursuit.

It's the same for Cairo...nothing more nothing less. But time will tell.

Monday, November 28, 2011

Jamie Oliver's Chocolate Love Cake with Cherries and Booze


Does the special person in your life like brownies? If so, you could make this Love Cake, a recipe from Jamie Oliver, especially for them. It has a squidgy brownie consistency, is dotted with cherries and has a boozy chocolate sauce poured over. The original recipe has crushed hazelnuts added but I like this dessert without.

Men often leave present buying until the last minute, and find it really difficult choosing presents. Why not be kind to him this Christmas and leave a list of ideas, this way at least you should get something you like. If you have a dish like mine, you can attach a craft label onto the handle with a list of your Christmas wishes! A Christmas Gift Ideas list I have put together can be found in my previous posting.

You are possibly wondering if I have done this - the answer is no, I'm just trying to help!


The dessert is quite rich and very similar to a brownie in taste and texture. I served mine with some of the reserved chocolate sauce, and a dollop of creme fraiche, which cuts through the richness.

You will need: 9 or 10 inches ovenproof dish greased.

For the cake: 2 tablespoons cocoa powder, 100g softened butter, 100g caster sugar, 1 egg, 100g self-raising flour, ½ tsp baking powder, ½ tin black cherries drained.

For the chocolate sauce: 25g butter, 142ml double cream, 75g dark chocolate broken into pieces, a splash of either brandy, rum, Amaretto or Baileys.

1. Preheat the oven to 180°C/350°F/Gas 4.
2. Mix the cocoa powder with a few tablespoons of boiling water and stir until the mixture is smooth.
3. In another bowl beat the butter and sugar together until light and fluffy, then add the cooled cocoa mixture, egg, flour and baking flour. Mix all together and pour into the ovenproof dish. Sprinkle over the cherries and bake in the oven for 25 minutes.
4. To check if the cake is ready, make sure it doesn't wobble too much then it's done, if not give it some more time in the oven.
5. To make the chocolate sauce: Place the butter in a small pan with the cream and bring to the boil. Turn off the heat and add the chocolate pieces to the pan. Give it all a good stir and leave for 5 minutes so the hot cream can melt the chocolate. Add a splash of either brandy, rum, Amaretto or Baileys and stir until thoroughly combined.
6. Once the cake is ready, pour over the warm chocolate sauce. Any sauce that is left will reheat in the microwave.

Good Luck!

Miguel Ángel Sánchez: Portraits Of Egyptians

Photo ©  Miguel Ángel Sánchez-All Rights Reserved

Since elections are going full steam ahead in Egypt, The New York Times' Lens blog has featured Portraits of Egyptians, a series of wonderful photographs by the talented Miguel Ángel Sánchez.

I absolutely love seeing photographic work of that nature...ethnographic to a large extent, and produced by borrowing the techniques of the Old Masters. Miguel Ángel Sánchez photographed 110 residents of Cairo in his studio; these included musicians, painters, politicians, writers, bloggers, shoeshiners, doormen, and the vendor of flowers above, which is absolutely my favorite amongst all of them. My least favorite is that of Zahi Hawass, the ex-Minister of Antiquities, not because of the image but because of the man himself. I don't know the man, but I developed an antipathy for his brash behavior and loudness in National Geographic television specials (as an example).

You will not find the photograph of the flower vendor on the Lens blog, but rather it's on Miguel Ángel Sánchez website. The flowers she's seen selling are jasmine, which are popular in Egypt for the powerful sweet smell. I believe the jasmine flowers sold on string strands are called "fol", and are popular in Egypt to deodorize one's car or to gift to one's sweetheart while strolling the city's gardens.

But back to the LENS blog...a comment was rather critical of the photographer for choosing to depict the Egyptians in Renaissance settings. I disagree. In choosing the lighting and poses similar to those we have seen so many times in museums and galleries the photographer creates acceptability for his subjects to the Western eye.

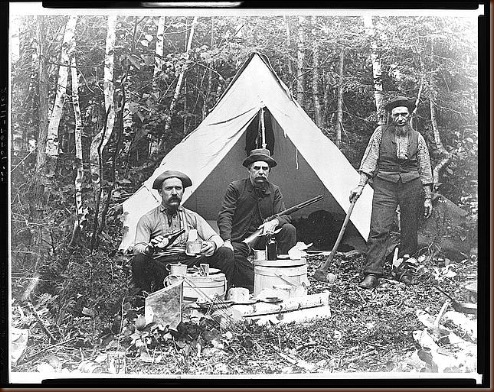
Camp at Norcross Brook, 1886

This photograph was taken by  Joseph John Kirkbride in August 1886.

8

Note the fawns foot handle axe held by one of the men in the photograph. 

Kitchen Delights Christmas Gift Ideas

A list of Christmas Gift Ideas from Kitchen Delights!


Saeco Lavazza A Modo Mio Extra Coffee Machine - I use my coffee machine a few times every week, it is very convenient and no mess involved. Coffee lovers will really appreciate one of these stylish machines.


SodaStream - Get Busy with the Fizzy - This gadget is good for the environment and both children and adults will enjoy using it. Simple and convenient, you will be able to make sparkling water on Christmas Day for all of your guests to enjoy.

Forman and Field Gift Hamper - Foodies will love this, a perfect gift for those who have everything!


Hungry? a book by innocent - the perfect family cookbook and a great way to get all of the family involved in cooking.

DK Step-by-Step Baking - Beautiful baking book, fabulous photographs, a huge array of techniques are covered with clear step by step photographs and recipes for every day of the year. All fans of the Great British Bake Off and those interested in applying to take part in the show will definitely appreciate this book.

MasterChef Kitchen Bible - This is one of the must have books for those aspiring MasterChef's and also fans of the television programme. There are techniques with clear photographs and includes Classic recipes and MasterChef contestants recipes.


Find Me A Gift - Joseph Joseph Baking Set - Baking is back and both the novice and the experienced will love this stylish and practical set.

Tala Retro Range - Icing Set and Dry Measure - Retro products are very popular at the moment and both of these are practical too.

Tefal Sensorielle Cookware - Tefal's toughest pans yet and can withstand metal utensils on the non-stick coating. The pans are light to pick up which is a very useful feature.


Jamie Oliver Tefal Hand Blender - I think this is a present for men because it is quite heavy but all Jamie fans will love this. It not only looks good but performs well too.


Hotel Chocolat - These chocolates have the wow factor and will definitely please both children and adults.

Lucky's Chocolates and Cake - Are for foodies who appreciate the finest and can afford it too!


Prestat The Mint Box - Prestat are Chocolatiers to Her Majesty The Queen and these will make the perfect after dinner mint.

Back soon!

Saturday, November 26, 2011

Siem Reap Journal: Issue #5

Photo © Tewfic El-Sawy-All Rights Reserved

Well, all good things have to come to an end. The Angkor Photo Festival's closing night included an intriguing photo talk by Roger Ballen, and the results of the 2011 Angkor Photo Workshops.

The award for the best photo story produced during the workshop was given to Carrie Lam*, a Singaporean photographer, for Cure...an ethereal collection of images. Her workshop tutor was Magnum photographer Antoine d'Agata.

I would be remiss if I didn't mention Francoise Callier and Jean-Yves Navel, who overwhelmed me (and many others) with their cordiality, and gracious hospitality during every night of the Festival, as well as the hard work of both Camille Plante and Jessica Lim which made a success of this Festival.

So thank you very much for a great event!

*I didn't find a website for Carrie Lam.

Global Post: Egypt's Women Of Revolution

Photo © Elizabeth D. Herman-All Rights Reserved

While I'm here in Siem Reap, I am following the events in Cairo with mixed feelings...feelings of pride and anxiety. The outcome of the 'rebooted' Egyptian revolution is impossible to predict, but some pundits have describe the current events in Tahrir Square as Egyptians trying to reclaim their January 25 revolution from the military.

There are a number of recent photo essays from Tahrir Square, but I thought I'd feature the work of Global Post's Elizabeth D. Herman titled Egypt: Women of the Revolution.

This is a compelling gallery of 18 photographs along with captions that tell us the back stories of each photograph. Last month, Elizabeth Herman spoke to 13 Egyptian women about the media’s coverage of women’s involvement in the Egyptian revolution. Their roles were varied, as were their experiences and reactions to the revolution, with some having actively joined the movement and others forced to do so by circumstance. All have much to say about how it has affected their lives, and how their experiences are similar to — and different from —those of other Egyptian women.

As is customary whenever readers' comments on the news of the Egyptian revolution appear in The New York Times, Islamophobia and political agendas raise their ugly heads. Comments describing the Egyptian revolutionaries as 'savages', and others hoping that the upheaval would not harm Israel (presumably this being much more important than Egyptians having basic human rights) are sent to the newspaper and published without consideration.

And, of course...we have some of the US press indulging the American proclivity for inward introspection, narcissism, and insularity. Just take a look at TIME's cover for its US edition as compared to the rest of the world's.


Both hilarious and sad at the same time.

Friday, November 25, 2011

Siem Reap Journal:Issue #4

Photo © Tewfic El-Sawy-All Rights Reserved

The Angkor Photo Festival is continuing its momentum, with today's penultimate night including a slideshow of the 5 finalists and the result of the inaugural Reminders Project Asian Photographers Grant. One of my favorite photographers, Shiho Fukada, is one of these five.

Since it's Friday, I dropped by the Siem Reap solitary mosque to explore whether there's anything worthwhile to document. Each Muslim community in Cambodia has a hakem who leads the community and the mosque, an imam who leads the prayers, and a bilal (as in Bilal, the Prophet Muhammad's muezzin) who calls the faithful to the daily prayers.

I met a few of the community members, one of whom spoke a reasonably fluent Arabic. While some of the Cham go to study the Qur'an at Kelantan in Malaysia, he learned it in Phnom Penh.

The two children were running around in the mosque, and the boy in particular was a bundle of energy.

Wednesday, November 23, 2011

A Beginner’s Guide to Bushcraft and Camping-Part 7

Bringing it All Together

So, in the past few posts you have seen me briefly go over some considerations, and in particular gear one might put to good use when making their first steps into the woods.

It is understandable that there will be apprehension, and a fear that you will do something wrong, but ultimately, with some common sense and a bit of practice, a summer overnight trip into the woods should not be a problem.

First, let us look at the total amount of gear we have.

Item Weight Cost
Day Hike Gear 15.8oz $68.00
Backpack 2lb 6oz (38oz) $30.00
Shelter 6lb 3oz (99oz) $188.00
Cooking Kit 11.5oz $17.00
Water Filter 1lb 1oz (17oz) $80.00
Toiletries 2.1oz $4.00
Total 11lb 7.4oz (183.4oz) $387.00

As you can see, our base weight (weight of the pack without food, water and fuel) is under 12lb, certainly a lightweight pack. With a first aid kit, the weight will go to a little over 12lb. We have managed to do it for under $400.00. Of course, as you noticed, it does not include the tools. I have left them as the last addition because they will be different for each person. There are many backpackers who never carry anything more than a knife, and do just fine. In that case, the tool list would not be a consideration, perhaps with the exception of a sharpening stone. On the other hand, the heaviest option that we discussed earlier would add another 4lb 5oz of the kit, bringing it up to 15lb 12.4oz, and the cost up to $477.00 (including the cost of a DC4 sharpening stone).

Remember, that this is not gear with which you will have to huddle by a fire to make it during the night, or have to spend four hours each day constructing a shelter, boiling water, or carving tools. With the above gear any backpacker should be able to spend an extended amount of time in the woods without any issue, and with equipment that does not need an explanation or require improvisation.

Of course, it is not all about the gear. Time in the woods will teach you small tricks that will make your stay much more comfortable. Before you know it, you will start to feel comfortable in the woods. You will no longer jump up during the night at every sound, you will figure out how and where to sit so that your back doesn’t hurt, or what wood to use to make your fire the warmest. There is no way I can cover that information here. That being said, there are a few posts that may be of some use to you. Check out:

Basic Tarp Configurations 
How to Make a Fire: A Beginner’s Guide
Cotton and Vaseline Tinder
Cheap, Lightweight Backpacking Food Part 1 and Part 2
A Beginner’s Guide to Hatchets  

The only tip I will give here, which I consider important, but don’t see too often, is to realize that some of your gear will get wet, while some of it will not. It may seem easy to place a plastic garbage bag inside your backpack and then place your gear inside. That will certainly protect it from rain. However, what happens when you pull out your tarp and it gets rained on? Do you put it back in the bag with all your dry gear? That is why I like to keep key items in separate bags. Stuff sacks are great, but a simple plastic grocery bag will do the trick just fine. Have one for your tarp, your shell layer, your ropes, maybe even your sleeping bag. That will make it a lot easier to pack up after it has been raining for a few hours. For a good low cost option for commercially available dry sacks, try the Outdoor Products Ultimate Dry Sack.

Remember, this is just a starting point. Each person will develop their own style of bushcraft and camping. You may decide to go more in the direction of using your tools to manufacture items you need, or you may decide that ultra light gear is the way for you, or anything in between. Your experiences and preferences will dictate what type of camper you will become, but the important thing is that you get out there and try it.

Gordon Ramsay's Apple & Pear Crumble Tart


A perfect tart for Christmas! With notes of ginger, cinnamon and nutmeg - apples, pears, a delicious layer of almond frangipane, crisp pastry and a crumble topping.

I'm not too happy about sweet pastry when you have lot's of sweetness in a recipe, it's just too much and sugar overload. A well made shortcrust pastry base, baked blind until crisp is my preferred method.

I can't see any reason why this tart shouldn't freeze successfully, it can be sliced into portions when it is fridge cold and then put in the freezer. It also heats up successfully in the microwave. The tart is a real winner and will feed a crowd too. Simply serve with ice cream or pouring cream.

Gordon Ramsay has given us some fabulous recipes for desserts and this apple, pear and almond frangipane tart with a crumble topping is amazing.

The recipe is what I call high faff but it can be made in stages to lighten the faff element. I used my dicing gadget to make perfect dice of apples and pears because my knife skills are too clumsy to do this and I would probably end up in A&E!


Serves: 8

You will need: 34cm x 11cm oblong tin greased.

Filling: 4 Braeburn apples peeled and diced, 4 pears peeled and diced, a large pinch of ground ginger and cinnamon, a grating of nutmeg, 25g butter, juice of half a lemon.

Crumble: 160g unsalted butter, 2tbsp soft brown sugar, 150g plain flour, 80g demerara sugar, 25g roasted chopped hazelnuts.

Almond Frangipane: 50g butter, 50g icing sugar, 1 egg, 10g flour, 50g ground almonds.

Pastry: 220g plain flour, 50g lard, 50g butter, 3tbsp cold water

1. For the pastry: Put the flour, lard and butter in a food processor, blitz until breadcrumbs, add the cold water and process until the mixture comes together. Tip onto cling film, form into a flattened circle. Cover with clingwrap and chill in the fridge for 30 minutes.
2. Roll out the pastry, line the tin and bake blind using Delia's method.
3. To make the frangipane: Cream the butter and icing sugar together, slowly mix in the egg, flour and ground almonds. Chill for 2 hours before using.
4. To make the filling: toss the diced fruit in lemon juice to stop them browning. Take the fruit and mix with the spices. Heat a knob of the butter until foaming, then add the fruit and toss for about 30 seconds. Add the soft brown sugar and cook until the fruit is soft, but not broken down. Cool.
5. To make the crumble: Rub the remaining butter into the flour and stir in the demerara sugar and hazelnuts. Fill the tart with the frangipane, then fruit, and top with the crumble mix.
6. Heat the oven to 180°C/fan 160°F/Gas 4. Bake for 30 minutes or until golden brown.

A Beginner’s Guide to Bushcraft and Camping-Part 6

Overnight Camping

Gear

Overnight camping requires a lot more gear than a day hike. The items I mention here should be considered additional to the ones mentioned earlier for the day hike. If any of you have good gear ideas, please share them with us here. The ones I mention are just those that have come across my path.

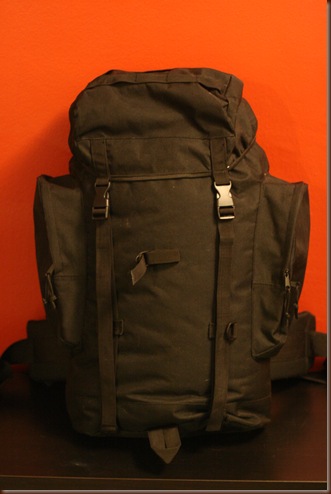
Backpack-Our growing amount of gear will require a more significant backpack. Unfortunately, most backpacks cost quite a bit of money. I would hold off on buying one until you have finalized your other gear. What you carry will significantly effect what type of pack you want to get. However, we do need something in which to carry our gear on these first few trips. Many people resort to the military surplus ALICE packs. While they do the job, there is a better pack you can find in many stores, including most military surplus stores or simply by doing an online search. It is the Rio Grande 45L Backpack.
462  

It is being currently produced, so it’s not surplus and costs about $30-$40. It can be purchased just about anywhere online. It is made from thick nylon, and has a rubberized coating on the inside. It has straps in the front which can hold your sleeping pad.
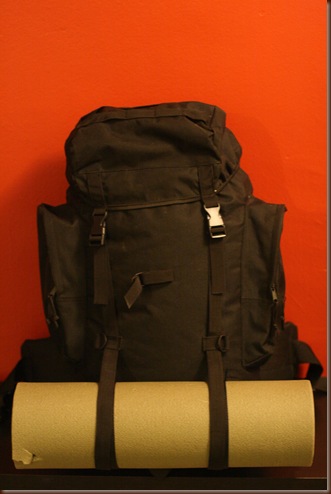
478

This is the pack I have been using for the past five years for my three season camping, and it has served me very well. It tends to ride a bit high on your back. To fix that, relax the shoulder straps so that the pack rests low on your back, and then bring the pack close to your back by tightening up the support straps at the top of the pack.
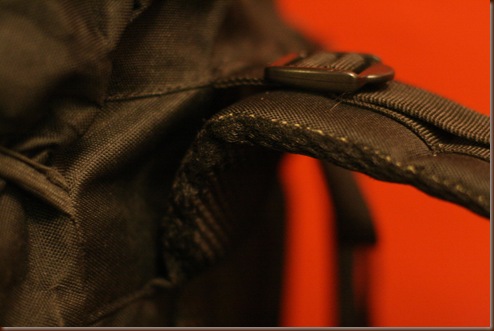
471

The pack has two side pockets and one on the top cover. It should be able to hold all of your gear for a three season overnight trip. It does not have a frame, but the back is stiff and well padded, with a comfortable hip belt.
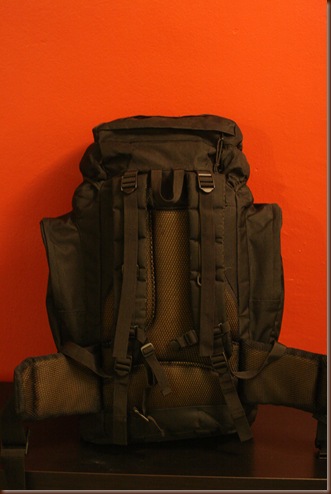
479  

It is one of the most comfortable packs I have ever used, and it has lasted me for years.

Item Weight Cost
Rio Grande 25L Pack 2lb 6oz (38oz) $30.00

Shelter

492

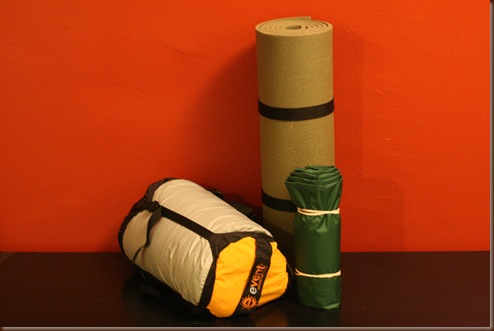
Tarp-If you want to save money, I am afraid that a tent is out of the picture. A decent backpackable tent is already in the $100 range. There are some cheaper ones, but they are too heavy for backpacking. The solution is a reasonably priced tarp. I say reasonably priced because there are some you can find in hardware stored for $10. I would stay away from them. While you can do just fine with such a tarp, they are heavy and loud once put up. By the second trip you would have already bought a new tarp, making that $10 a waste. By buying a reasonably priced one of good quality, you can use it for a long time. The lowest cost one I have been able to find is the Equinox (Campmor) 8x10 Nylon Tarp. It will cost you about $40. It is by no means a top of the line tarp, but it will do the job admirably. In the picture above, it is being held together by two rubber bands. You should also bring a regular plastic bag in which to wrap it when it gets wet.

There are also several ways to pitch a tarp that will create a tent-like feeling. If however you insist on a tent, there are decent options in the $100 range. Of course as with most other backpacking gear, you will pay for the low cost with higher weight and bulk. The Kelty Salida 2 is a good choice, which will cost you $160.00 and weigh about 4lb 8oz. Many manufacturers have tent option in that price range with similar weights.

Sleeping Bag-The sleeping bag is one of the most important pieces of equipment that you will carry, as it is your primary shelter. It is the sleeping bag that will keep you warm without the need for a fire, and keep out the wind. All the other shelter components are just there to supplement the sleeping bag. You may have seen people recommend wool blankets as a low cost alternative for a sleeping bag, but that is not a viable option unless the weather is very warm. For the weight, wool blankets provide low amount of insulation. To match the insulation you can achieve with a 3lb synthetic sleeping bag, you will need over 10lb of wool blankets. You will also note that once you get that many wool blankets, they turn out to not be a cheaper option.

Unfortunately, there is no extremely low cost way to get around a sleeping bag if you plan on backpacking with it. There are however lower cost options. To begin with, avoid rectangular sleeping bags. While they are comfortable and often cheap, they do not provide the best insulation. You should look for what is called a mummy style bag, which will fit close to your body and preserve the most heat.
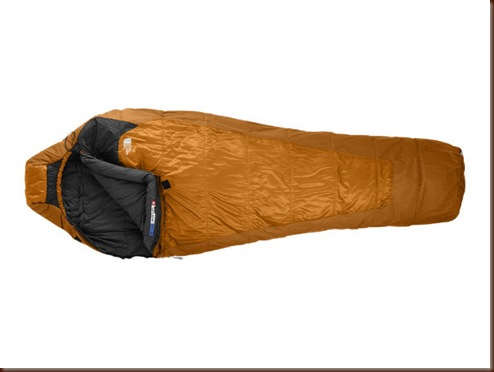
the-north-face-cats-meow-20f-syn-16410-f

The shape aside, when looking at sleeping bags, you will notice two main types. One type uses synthetic insulation, while the other uses down insulation. Each type has benefits and problems, but the largest benefit we are concerned with here is the cost. Synthetic bags typically have an advantage in this category, especially when looking at top of the line products, but tend to weigh more.  Keep in mind however, that not all down bags are made equal. Down bags are rated by “fill”. A 900 fill down bag is top of the line and will cost accordingly, while a 500 fill down one, while providing the same insulation,  is not nearly as good in terms of weight and compressibility, and as a result can cost quite a bit less. In the end, we can find bags of both designs in the $100 price range, but they will have similar weight and compressibility. Which one will suit you best is up to you and is beyond the scope of this post. I think you will do fine with either one.  

For three season backpacking, I would aim for a 20 degree synthetic or low fill down mummy sleeping bag. That should cover about all of your needs. Keep in mind that some people get colder more easily than others, so if you know you get cold easily, take that into consideration. Some good lower cost designs include the North Face Cat’s Meow, which costs about $150.00 and weight 2lb 10oz, and the Kelty Cosmic Down, which costs $110.00 and weights 2lb 8oz (regular size). If you search a bit online, you can find both in the $100-$120 range. I am no expert on sleeping bag models, so speak to someone at the store for more details.

I know that with many of these items there is a temptation to want to move “up” to the next level in quality. My opinion is that the only place where you will see a significant increase in performance by doing that is with the sleeping bag. So, instead of buying that $30 knife, or the $15 water bottle, or the $65 tarp, take all that money and put it towards a better sleeping bag. It is well worth the investment.  

Sleeping Pad-You may have heard that a sleeping bag does not provide any insulation under your body because the fibers get compressed by the weight of your body. That is only partially true. A sleeping bag provides a good amount of insulation under your body. Even so, you will want some sort of a sleeping pad. This will make the ground more comfortable, and will provide additional insulation from the ground and moisture. There are a number of inflatable pads out there, but if you want the best performance for the money, go with a simple closed cell foam pad. The Thermarest Ridge Rest SOLite is a good example, that will cost you under $20. If you want to look online at Army surplus equipment, the surplus sleeping pads are very good value at about $5. There is a commercially available equivalent-the Blue Foam Pad, which will cost you just under $20.

Rope-In order to set up your tarp, and performs some general tasks around camp, you will need some rope. A good option is paracord. It is very strong, while being fairly thin. You can buy 100ft for about $4 at any outdoor supply store. Keep one long length (at least 50ft) to use as a ridge line for your tarp, and then about six fifteen foot lengths for the sides of the tarp. You should have a few extra lengths as well.

Item Weight Cost
Tarp 1lb 9oz (25oz) $40.00
Sleeping Bag 3lb (48oz) approximation $120.00
Sleeping Pad (Blue Foam Pad) 14oz $20.00
Rope (150ft) 12oz $8.00
Total 6lb 3oz (99oz) $188.00

Cooking Equipment

501

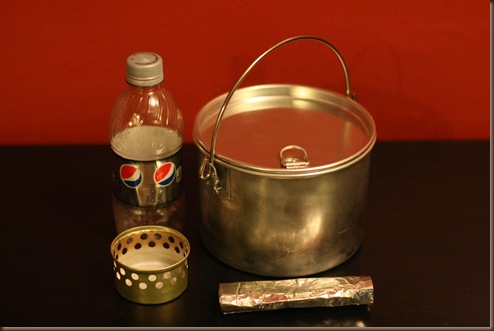
Pot-When you start staying out overnight, you will want to start cooking some of your food. Here I am talking about things like Ramen noodles and rice. For that you will need a pot. I believe that the best balance between cost, low weight, and performance is achieved by aluminum pots. My favorite one in this category is the  Open Country 2 Qt. Aluminum Pot. It cost $10.

If you need an extra container, a plastic Ziploc container works very well, and will let you store any left over food.

Stove-After you have been out in the woods for some time, assuming you practice, you will become accustomed to cooing your food on an open fire. Until then though, and even after that as a back up, it is good to have a small stove. There are many options and designs out there, but for three season backpacking, if interested in keeping the cost down, I would go with the Super Cat Alcohol Stove. You can make it out of a cat food can using just a hole punch. The can will cost you $1, and the hole punch $1.50 as Staples. It is a lightweight and easy to use option. Don’t forget to bring a simple windscreen made out of aluminum foil. It will significantly increase the efficiency of your stove.

You will need to carry some denatured alcohol as a fuel. I like the S-L-X Denatured Alcohol, which you can find at any hardware store. You can get a quart of the fuel for $5. To carry it, get a bottle that is around 10oz. I use a small Pepsi bottle which is 10oz (smaller than the regular bottle). The bottle of Pepsi will cost you an extra $1.

Don’t forget to bring a spoon. The is the one object for which I will not give you a price, because I know all of you have a spoon somewhere in the house.

Item Weight Cost
Pot 7.7oz $10.00
Stove (Super Cat) 0.2oz $3.00
Windscreen (aluminum foil) 0.5oz $0
Spoon (regular table spoon) 1.4oz $0
Fuel Bottle 0.7oz $1.00
Bandana 1oz $1.00
Total 11.5oz $15.00 ($17.00 with cost of fuel)

Water Purification-If you are going to stay out for an extended period of time you will have to purify water somehow. It is just impossible to carry sufficient amount to get you through the whole weekend. One way to do it, which is recommended very often by the “complete bushcraft kit for under $100" crowd is to boil your water. While it works, it is simply not a viable option. You can not be expected to stop by the trail and make a fire every time you have to refill your water bottles. I am also not a big fan of drinking hot water in the middle of the summer. If however your style of camping allows for this boiling method, it is a sure way to purify the water.

Another option that is sometimes recommended is small filters like the Aquamira Frontier Pro. The problem with those filters is that they do not filter all that much. In order to remove all parasites and bacteria, you need a filter that filters down to 0.02 microns. The above filter filters down only to 0.2 microns. It will remove some of the larger parasites, but most bacteria like Ecoli will get through. One way to compensate for that is to then use a chemical treatment like the tablets mentioned earlier. This will work well, but consider the cost of your total system. You will need two water bladders, one for dirty water and one for clean ($20 each), the filter itself ($20), and the tablets ($10). You have now spent $70 on the filter system.

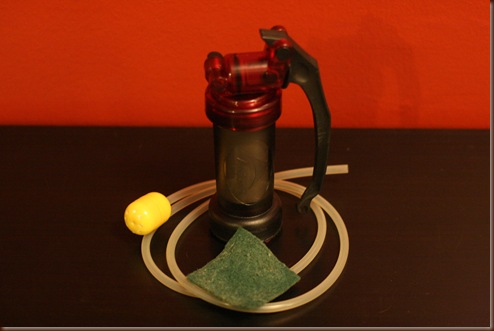
There is an option that I prefer, and requires a lot less assembly and general playing around. For that money you can get yourself an actual pump filter like the MSR Miniworks EX ($80), or the Katadyn Hiker Pro ($75). They are both robust, well tested filters that will filter down to 0.02 microns and do it for a long time.
507

It is money well spent in my opinion, and I would not recommend that anyone go into the woods for an extended period of time without one, especially when just starting out. It is a heavy and expensive option, but it is the one I always go back to. Here is some info on a DIY Prefilter for the MSR Miniworks EX.

There are people who successfully use only water purification tablets for water treatment. However, if you are just starting out, I would recommend that you go with a filter. Using only tablets requires a lot of planning and knowhow, as well as precise timing.

Item Weight Cost
MSR Miniworks EX 17oz (with bag, sponge, and prefilter); 14.6 as advertised $80.00

Toiletries-You should also bring some other miscellaneous items like toilet paper and soap. Do not bring a whole roll of toilet paper and a bar of soap. Smaller amounts in a ziplock bag will do just fine. None of this should cost you more than $2.

Item Weight Cost
Soap 1oz $1.00
Toilet Paper 0.1oz $1.00
Travel Tooth Brush 1oz $2.00
Total 2.1oz $4.00

Tools-When it comes to tools, there is a bit of controversy. Many people insist that they are essential for anyone going into the woods. I personally do not believe that to be the case. Many people spend months in the woods with nothing more than a knife as a tool. With the above equipment, you should have no problems camping without any additional tools. That being said however, they can certainly make the stay more enjoyable, and allow you to take on projects which would otherwise be out of reach. I carry an axe and a saw because I like using them. If I am honest however, I can easily get by without them. Before you start spending any money on axes, saws and more sophisticated knives, make sure you have all the above basics well covered.  

Saw-Here you have to decide what size saw you want. A larger saw will generally cut faster, but will weigh more. A good small option is the Kershaw 2550X, which will cost you about $20. It is a very good folding saw. A good larger saw is the Trail Blazer 24 inch Take Down Buck Saw. You should be able to find it for about $25. If someone is charging you more than that, keep looking. Here is some info on Modifying a Trail Blazer.

539

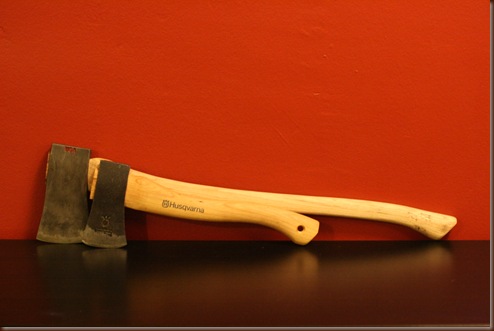
Axe-If you plan on carrying an axe, I would strongly recommend that you learn how to work on one first. You should have no problem taking a completely dull and damaged axe and bringing it back to working condition with minimal tools. If you can not do that, I say you can do just fine with a saw and a knife. If however you want an affordable axe, there are two that I would recommend. The first is the Husqvarna Hatchet. It will cost you $40. You will most likely have to sharpen it, but it is a great value for the money. For a larger axe, I would recommend the Council Tool Boy’s axe, which will also cost you $40. You will again have to do some work on the edge, but it is one of my favorite axes currently on the market. Fiskars also offers a good selection of axes which are affordable and ready for work out of the box.   
535  

Sharpening Stone-If you are going to be in the woods for any extended period of time, especially if you have an axe with you, you will need a sharpening stone. I like stones that do not require water or oil to operate. I use the Fallkniven DC4 stone, which is not cheap at about $27. If you look around you can find better values, although I do not know enough about them to say more than that. Make sure your stone has a course and fine side. The fine side should be very fine, as that is how you get that razor edge.

Item Weight Cost
Bahco Laplander 6.2oz $20.00
Trailblazer Saw 1lb 5oz (21oz) modified $25.00
Husqvarna Hatchet 2lb 3oz (35oz) $40.00
Council Tool Boy’s Axe 3lb (48oz) $40.00
DC4 Sharpening Stone 2.7oz $25.00

The weight of your tools will depend on your choices. The lowest weight option with the Husqvarna Hatchet and the Bahco Laplander saw weighs 2lb 11.9oz (43.9oz). The heaviest option with the Trailblazer Take Down Buck Saw and the Council Tool Boy’s Axe will weigh 4lb 5oz (69oz). I have included the weight of the DC4 sharpening stone in the calculations, but you should make an effort to find a cheaper stone, even if it is heavier.

As always, don’t forget to bring food. In the next post I will try to link to some information on backpacking food, as well as techniques for using the above gear.  

You may also want to bring an extra t-shirt and an extra pair of socks just in case. Do not go overboard on the extra clothing. You do not need to change your clothes every day. You’ve been camping-people will understand.  

I strongly believe that the above gear is more than adequate for a comfortable three season trip into the woods. I have cut weight and cost where possible, but have attempted to preserve all the items that an average backpacker would expect to have on a weekend trip.