Wednesday, August 31, 2011

Spatchcock Chicken with Lemon, Oregano and Paprika and Crunchy Rice Salad


My husband is brilliant at cooking a barbecue and will cook outside for us in all weathers, providing there is a glass of wine to hand! The weather was a bit gloomy last Sunday but he cooked such a fabulous meal for us it didn't matter. I am sorry but you will all have to find yourself an 'all weathers' man for yourself, mines definitely taken!

There are a couple of other recipes on this site for spatchcock chicken - Spatchcock Chicken with Gremolata and a recipe by Nigella Lawson Spatchcock Chicken with Lemon and Rosemary, I couldn't choose a favourite because I enjoy them all equally.


I had already skewered the chicken and then decided to cook the chicken under a brick, which is simply a brick (or similar heavy weight) wrapped in a double layer of foil and placed on top of the spatchcock chicken to weigh it down and to ensure more of the surface area is in direct contact with the cooking surface. It's best to oil the foil otherwise it tends to stick to the chicken skin.

To spatchcock a chicken:
Sit the chicken breast-side down on a clean work surface. Using poultry shears or a good pair of kitchen scissors,cut along the centre back of the chicken, running from thigh to wing on each side and removing the backbone from tail to neck. Open up the chicken and flatten by pushing down hard on the breastbone. Secure in position with metal skewers running from thigh to opposite wing.

Only a few ingredients are required for this recipe and if you can find a brick to use so much the better.

You will need:

1 whole spatchcock chicken, 1-2 tsp olive oil, grated zest of 1 lemon plus juice of 2 lemons, 1 tsp paprika, 1/2 teaspoon salt, 1 tsp paprika, 1 tsp ground black pepper, 1 tablespoon dried oregano

1. Put the oil, lemon zest and juice, paprika, salt and black pepper into a bowl and mix together.
2. Put the chicken into a large freezer bag and pour in the marinade to coat the chicken. Marinate for 1 hour.
3. Heat the barbecue until hot. Sprinkle the oregano liberally all over the chicken and cook for 40-50 minutes until golden and cooked through. Remove to a plate and leave to rest for 15 minutes.

Serve with a lovely Crunchy Salad.


You will need:

175g basmati and wild rice, 50g raisins, zest and juice 1 lime, 6 tbsp olive oil, 1 deseeded and chopped red chilli, 6 sliced spring onions, 1 deseeded and chopped red pepper, 4 celery sticks scrubbed and chopped, 1 red-skinned apple cored and chopped.

1. Cook the rice according to the instructions on the pack until tender. Strain the rice and cool by running cold water over. Drain well.
2. Whisk together the lime zest and juice and the olive oil, season with salt and ground black pepper.
3. Tip the cooled rice into a bowl and stir in the dressing followed by the rest of the ingredients. Keep in the fridge.

A nice glass of bubbly!

How to Make a Leather Axe Sheath

Previously I posted about some basic leather working gear which would allow you to complete a few projects. You can find the post on the low cost kit here, and on the intermediate kit here. For this particular project I will be using the items in the intermediate kit, but it can also be done with just the low cost kit.

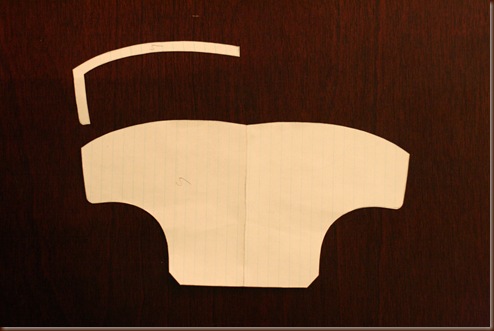
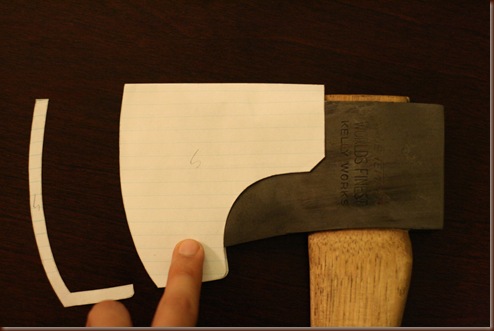
The first step when making a leather axe sheath is to create the template. This is probably the hardest part of the process. Take a piece of paper, place the axe head on it, and start designing the sheath. Keep in mind the sheath has to be large enough to allow for stitching around the axe head, while still giving it room to move in and out. For this particular kind of sheath, I also use an insert where the two sides of the sheath meet. This creates a stop for the blade, so it does not cut through the stitching. You will have to make a template for that insert as well.

006

When you cut out your template, fold it over the axe head and see if it fits, leaving enough room for stitching. Keep in mind that leather is thicker than the paper. When you fold it over the axe head, some of the length will be eaten up in that fold (much more so than with the thinner paper). You will have to compensate for that by leaving the paper template a little longer on the end opposite where the you are making the fold.

012

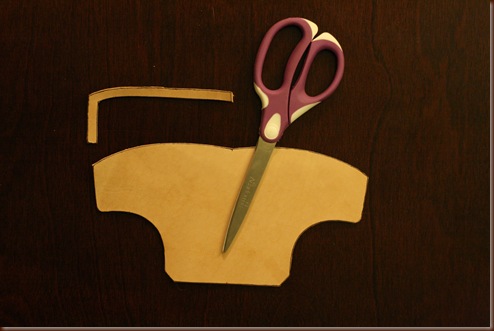
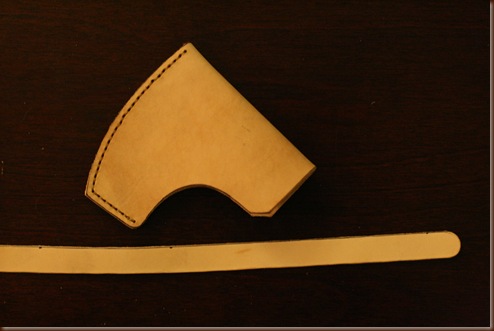
Now trace out the prepared templates on to a piece of leather and cut them out using a pair of scissors.

031

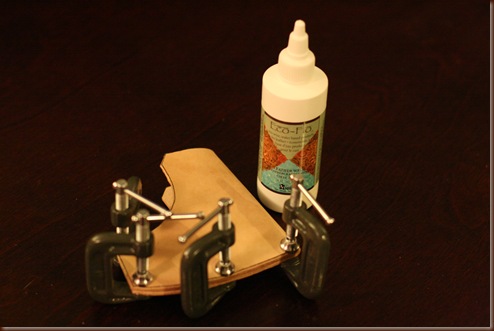
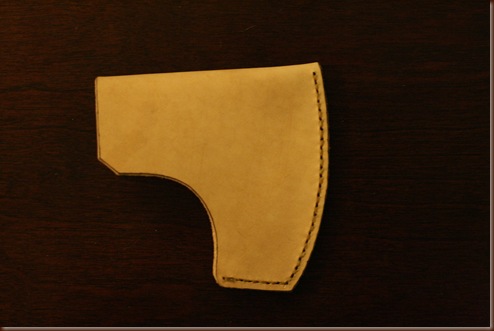
Now using some leather glue, fold over the sides of the sheath into place, put the insert along the edges in between the fold, and glue the assembly. A set of small clamps makes this step a lot easier.

042

After an hour the glue should by dry, and you should have the general outline of the sheath. Test it on the axe head and make sure it fits before you do any further work with it.

047

If it fits, take your stitch groover, and make a groove along the edge of the sheath where you just glued the two pieces along with the insert. Make sure the groove aligns about the middle of the insert (if your insert is a quarter of an inch wide, make the groove an eight of an inch from the edge of the sheath).

056

Then take your overstitch wheel and mark the stitch holes within the groove that you just made.

071

Now take your awl and make the holes that you just outlined. The holes should be of good size so you can easily pass a thick needle through them.

090  

Now take a length of artificial sinew (or any other cordage you line) and thread a needle through each end.

104

Thread the cordage through a hole at one of the ends of the sheath, until the center of the cordage is in the hole. Now, pass one of the needles through the next hole, and pass the other needle in that same hole from the other side.

114

Continue the process until you have completed the stitching. When you reach the last hole, just double back once, and cut off the excess cordage.

117

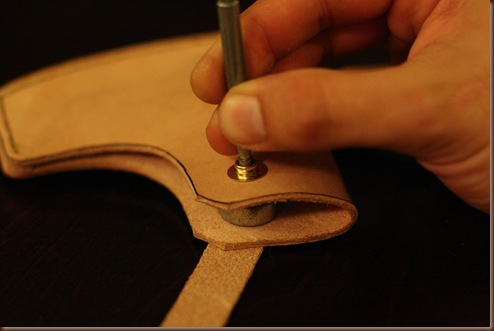
All that is left now is to add the strap that will hold the sheath. Cut out a length of leather to the desired width.

127

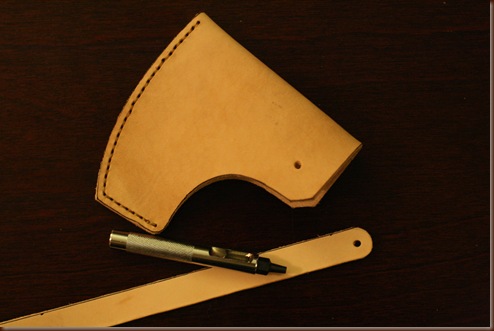
Use a hole punch to make a hole in the locations where the strap will be attached.

 134

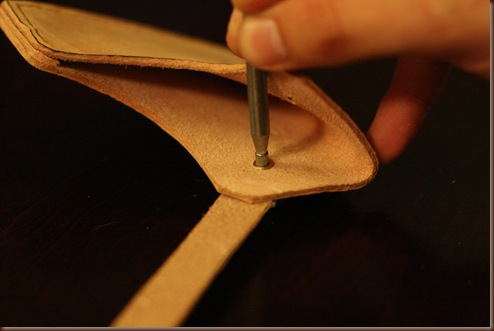
Attach one of the strap ends with a tack.

144

On the other side of the sheath, place the bottom part of the snap.

153

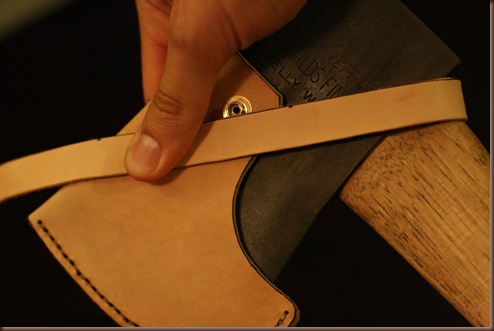
Now put the sheath on the axe, and measure out the length of the strap.

157

Make a hole at the desired location and attach the top part of the snap.

170

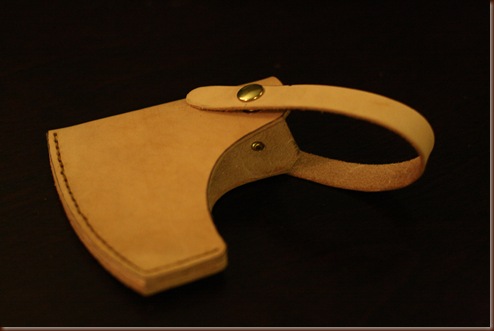
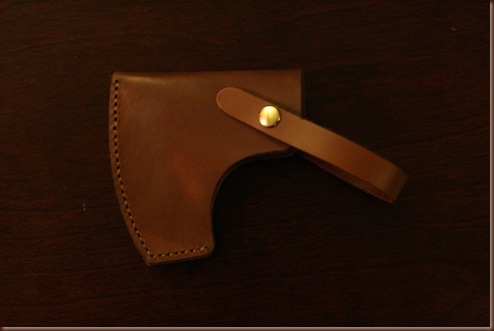
Your sheath is now complete. Coat it with some oil for protection.

180

I’m sure there are better ways to make a sheath, but this is how I make mine. It is a fairly easy process. The hardest part is making the template. The same sheath can be made with the low cost leather working kit simply by using tacks instead of stitching. 

Durga Puja: The Idol-Makers Of Kumartuli

Photo © Dibyangshu Sarkar—AFP/Getty Images

It's less than a month to my forthcoming photo-expedition/workshop Kolkata's Cult of Durga Photo~Expedition & Workshop™, whose primary aim is to photograph the innumerable rites associated with the Durga festivities, documenting some of the ornate pandals (platforms on which the deities are displayed), and ultimately their immersion in the city's Hooghly river.

Coincidentally, Time's LightBox featured the above photograph of artisans work on semi-finished clay statues of the Hindu goddess Durga in Kumartuli, a neighborhood of Kolkata famed for its clay idols. It seems that ongoing monsoon rains have made it hard for idol makers to finish on schedule.

Also coincidentally, the Photo Blog of MSNBC has a gallery of photographs by AFP photographer Dibyangshu Sarkar , who paid a visit to Kumartuli, the village of the idol-makers in Kolkata.

It seems that in the past, wealthy families would invite the idol-maker artisan to their homes and fashion the idol there, instead of at a workshop. According to the narrator, "the most intriguing part would be the painting of the third eye of the Goddess. The artisan would sit in meditation sometimes for hours and then suddenly in one swift stroke of his paint brush, it would be done."

In April, I posted Chhandak Pradhan's The God Makers, a gallery also documenting the clay artisans of Kumartuli in Kolkata.

Tuesday, August 30, 2011

POV: Is Leica Making A Micro Four Thirds?


I am not in the prediction business, and I'm not a technophile...I'm just a camera user, who just a few months ago, bought a Leica M9 as a street photography tool, and use a Panasonic GF1 for everyday photography. I'm also a long time Canon cameras user, but those I use for my travel photography business.

Having laid down my iron-clad qualifications for being an "fallible predictor", I read with interest many of what has been written in blogs by people with more industry insight and technological expertise than I, and who predict the advent of a Leica M10 (and possibly a new series of more advanced M lenses AF capability) and others who say that a smaller new mirror-less design is in the offing.

I throw my hat with the latter. The electronic viewfinder interchangeable lenses cameras offer the image shooting quality and flexibility of a digital SLR and the portability of a digital point and shoot....and have been a huge hit with consumers, pro-consumers and professionals. Why wouldn't Leica seek to enter that market?

The current line-up for Leica digital cameras are the S2 DSLR ($23,000), the M9 rangefinder ($7000), the X-1 ($2000), the D-Lux 5 ($800) and the V-Lux 30 ($750). I can see a gap between the X1 and the M9 in terms of price point...a $3500 Micro Four Thirds could fit very well in that gap.

Naturally, it would require a couple of new AF lenses...could they'd be manufactured in Japan? I know. That's the weakest link in my predictive chain.

That being said, I really feel there's an enormous market for such a camera in Leica's line up. It would not cannibalize sales from the range finder crowd, and would induce the buyers of the point and shoot models to spend more to acquire a more versatile tool.

How much would I bet that Leica will announce such a product at Photokina? About $5.

Monday, August 29, 2011

Grinding/Re-profiling an Axe ... Continued

Earlier you saw a video I made about grinding, or re-profiling an axe. Without getting bogged down in the terminology, I just showed how to thin out an axe bit to the desired thickness using a file. You can see the video here.

I have received several questions, asking about more details, so I decided to make this post so I can better diagram the process.

The first question of course is, “how thick should the bit of an axe be?” The answer will depend on what you want to do with the axe, and on which part of the bit you are talking about. Here I will try to give the answer along with the direction for each step of the re-profiling process. 

Step 1

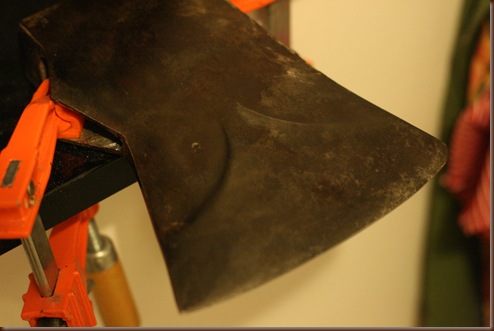
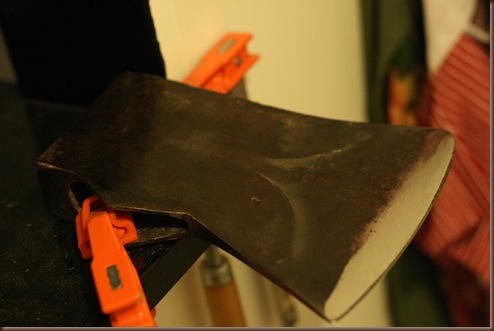
Let us start with an axe which has had very little work done to the bit. Let us also assume that it is fairly thick at the bit. Clam down the axe head, and get a sharp file. I like to use an 8 inch, 200mm, single cut file, but that is a matter of personal preference. I know people who use cross cut files and files of varying lengths.

003

For the first step, we will work on the part of the bit that is located between 1/16 from the cutting edge and 1 inch back from the cutting edge. This is the first section of the bit that we will have to thin out. For now, we will not be touching the cutting edge at all. This part of the bit will effect the penetration and splitting ability of the axe. If you want an axe that will penetrate deeply into wood, then you want this section to be as thin as possible, so it provides the least resistance when entering the wood. On the other hand, if you want a splitting axe, you want this section thick, so it can push apart the fibers. For the same reason, a thicker convex here may help you with softer, more flexible wood, because it will help pop out the chips when chopping. 

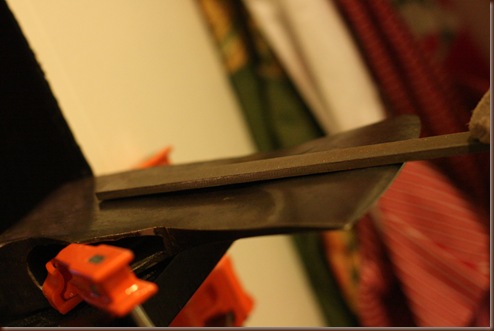
For my general purpose axes, I like to have this part of the bit be at about a 20 degree angle. That means that when filing each cheek, I will be filing at a 10 degree angle from the horizontal.

Step 1

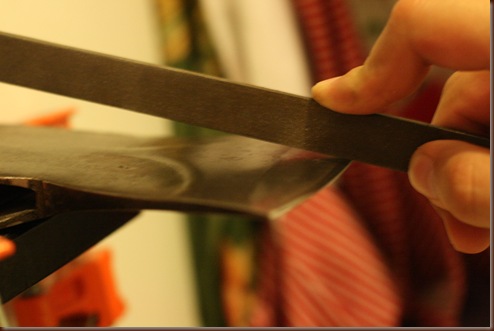
Position the file at a 10 degree angle from the horizontal, and begin filing, maintaining the same angle along the whole bit.

005

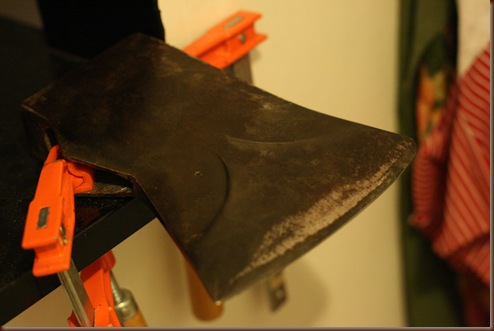
While maintaining the same angle, you want to create a uniform thickness along the whole bit (minor variations aside).

008

On an axe that has cheeks which have been convexed from heel to toe, this will require you to remove more metal from the middle of the head than the edges, as the head is thicker in the center than the sides.

009

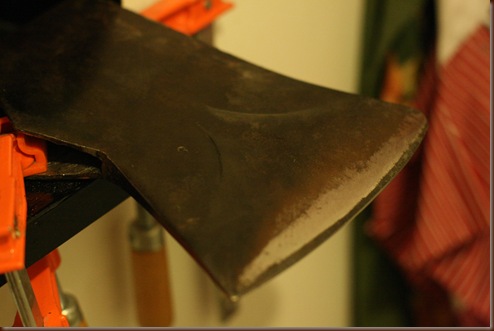
Continue this process until you reach about 1/16 from the cutting edge.

013

Step 2

Now it is time to start working on the cutting edge itself (the part between the cutting edge and 1/16 back from the edge).

This part of the convex can also have a different and separate thickness. A thinner convex here will allow for better penetration, and glance less off the wood when approaching it at a steep angle. This makes a thinned out convex on this section good for carving as well as chopping. A thicker convex here will make the edge more durable, and require less sharpening, along with making it less prone to damage.

For this step, you may want to start with a 30 degree overall angle on the bit. I like it a little thinner, but that is a decision you can make for yourself after using the axe. The final step will thin out the bit a little further anyway.

Step 2

Position the file at a 15 degree angle from the horizontal (in the picture the file is on its side for demonstration purposes only), and begin filing the area between the cutting edge and the already filed down back section of the bit. Again, maintain a uniform thickness along the bit.

025

Step 3

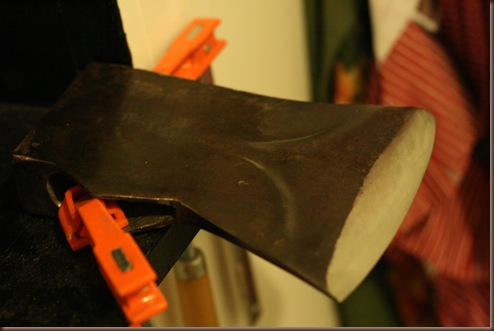
All that is left to do now it to smooth out the transitions between the different filing angles, and turn the surface into one continuous convex.

Step 3

This process will remove more metal, further thinning out the convex. During this process you can make adjustments to the final shape of the convex by removing more or less metal from the transition point between the two filing angles. At the end the final convex will be at about 24 or 25 degrees overall.

030

All that is left to do now is to flip the axe head over and repeat the process on the other side. Something that may help with establishing the desired angle is to get an axe whole grind you already like, and try to approximate it. You can usually do that by feel, just by pouching the two bits. After some practice, you will be able to see whether or not you like the grind just by holding it between your fingers. 

Darkness Visible Afghanistan


I occasionally post on projects that I believe ought to be supported by the public at large, and one such project is Darkness Visible Afghanistan by photojournalist Seamus Murphy, whose aim is to raise $10,000 to create a documentary movie based on his many years traveling and photographing in Afghanistan.

"My mission is to promote an understanding of this mysterious, complex and fascinating culture."

Seamus Murphy has been photographing Afghanistan since 1994. He published a book, also titled A Darkness Visible: Afghanistan, as a chronicle of the country and its people over those tumultuous years. For two decades, Seamus has also worked extensively in the Middle East, Asia, Africa, Latin America and most recently, America. He has won 7 World Press Photo Awards and a World Understanding Award (POYi) for his work from Afghanistan.

Of the book Darkness Visible, Afghanistan, Philip Jones Griffiths wrote that "Seamus Murphy was a poet with a camera who captured the essence of life in one of the oldest countries in the world. It is a humanistic view of a misunderstood country and a rare glimpse into the nation's soul."

Many of the documentaries on Afghanistan that I've read about are focused on war, on the Taliban and its excesses...so I'm happy to dedicate a post to Mr Murphy's project...a documentary that hopes to promote its culture, its history and its people.

Sunday, August 28, 2011

Charlotte Rush Bailey: Nominee B&W Spider Award


Photo © Charlotte Rush Bailey-All Rights Reserved

I am very pleased to report that Charlotte Rush Bailey was presented with the 6th Annual Black and White Spider Awards Nominee title in the category of "Amateur - Portrait" for her image of Mother India at the Nomination & Winners PhotoShow watched by 40,000 online viewers who logged on live from 154 countries to see the climax of the industry's most important event for black and white photography.

The Black and White Spider Awards is in its 7th year, and is a international award honoring black and white photography. This event shines a spotlight on the best professional and amateur photographers in a annual competition and globally webcast event, reaching photo fans in 154 countries.

The judges reviewed the entries online for eight weeks before making their final nominations and Charlotte's "Mother India," which they described as an exceptional image was honored by nomination of the Jury.

The image was made during my Tribes of South Rajasthan & Kutch Photo~Expedition™ in which Charlotte participated.

For more of Charlotte's talented photography, be sure to visit her website.

Monsoon...


Photo © AP / Manish Swarup

With all the hoopla about Irene and its impact on New York City (this post was written yesterday evening before the big 'hit'), I thought I'd feature another gallery of monsoon photographs as shown on The Sacramento Bee's photo blog, The Frame.

I chose this particular photograph because of the man clutching the bag...his expression is just priceless. Enlarge it by clicking.

That's all I have time for...

Saturday, August 27, 2011

The Big Picture Does Janmashtami


Photo © Altaf Qadri-All Rights Reserved

The Big Picture featured a gallery of photographs covering the festival of Janmashtami, a Hindu festival celebrating the birth of Krishna, an avatar of the god Vishnu, and is one of the most popular festivals in the Hindu Religion.

Houses are beautifully decorated, and sweets are offered to the deity. Many of the devotees fast for that day and break it after the birth of Krishna at midnight. People also make child footprint marks using some flour mixed with water in the entire house and sing devotional songs.

The Big Picture site tells us that children and adults dress as Krishna and his consort Radha in bright, elaborate costumes and jewelry, while human pyramids form to break a large earthenware pot filled with milk, curds, butter, honey and fruits.

Friday, August 26, 2011

Old vs. New Axe Comparison-Convexed Cheek Design...Continued

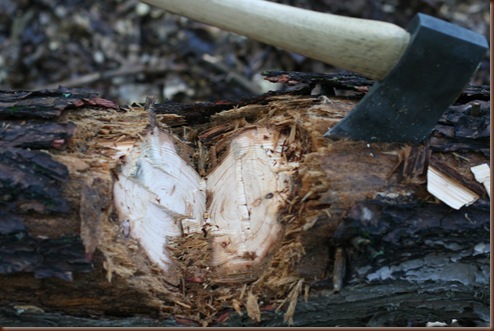
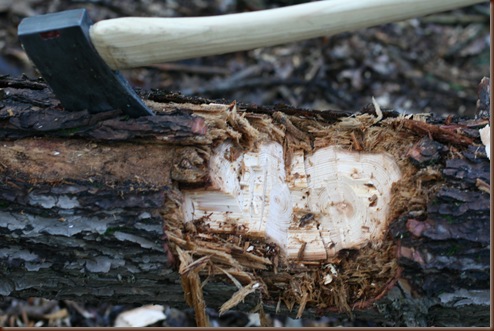
Last week I posted a video which compared two axes, one with convexed cheeks, and the other with flat cheeks. You can see it here. The test focused on seeing if one axe stuck in the wood more than the other. The results of the test seemed to show that both axes performed in a very similar way. It was suggested that perhaps the differences would be more apparent if the test was performed in green of soft wood. To that end, I located a small patch of pine, and repeated the test.

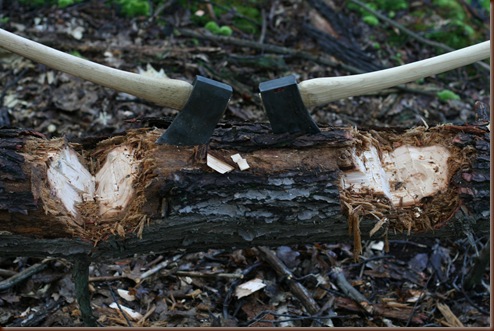
Here you can see the results after 25 swings with each axe. Both the True Temper Worlds Finest (convexed cheeks) and the Council Tool Boy’s Axe (flat cheeks) took exactly 45 seconds to complete the test. The results seem identical as well.

016

Here you can see a close up of the True Temper.

027

And here is a close up of the Council Tool.

036

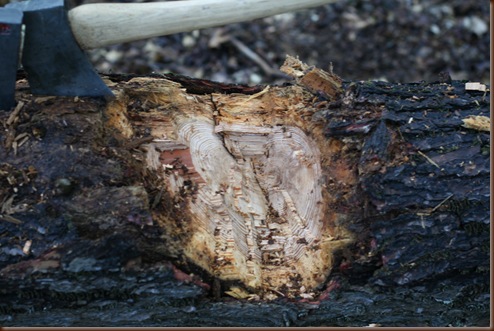
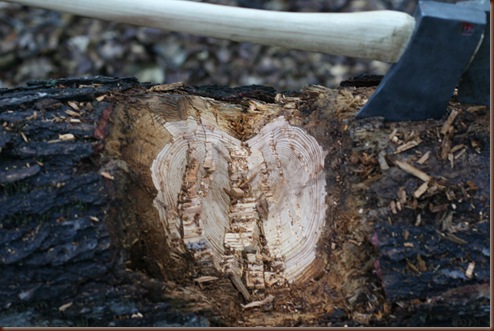
I repeated the test with another pine. This time I did 50 swings with each axe. The True Temper took 1 minute 24 seconds to complete the 50 swings, while the Council Tool took 1 minute 31 seconds to complete the test.

066

Here you can see a close up of the True Temper.

082

And here is a close up of the Council Tool.

080

The results again seem to be very similar. In the last test it did take me 7 seconds longer to complete the 50 swings with the Council Tool axe. I am not sure if that difference is statistically significant, but either way, those are the results. As always, make your own conclusions.

Review: Guylian Praline Sea Shells


These Guylian signature Sea Shell Chocolates are a real classic. They are made using only the finest, hand selected Mediterranean hazelnuts, which are roasted and caramelised to perfection before being blended with premium Belgian chocolate.

They make a fabulous gift, or simply an indulgent treat, so why not treat yourself to a box this Bank Holiday. I sat last night eating a few of these and I have been very good and saved the remainder for the weekend.

I always wondered where the name Guylian came from - this is a true story of love and chocolate which began in the 1950's with the marriage of Guy Foubert and Liliane, they joined their names to make the company name Guylian. Guy developed the signature hazelnut praline filling and Liliane designed the shining marbled look and the delicately sculptured shapes.

The Guylian Praline Sea Shells are available in a 250g box (RRP £3.99) from all good supermarkets.

Guylian have a wide range of chocolates so please visit their website and take a look at all of the tempting chocolates!

Thank you Ethna.

Dark Light: Abbas & Melisa Teo


I'm glad I stumbled on Dark Light, a joint exhibition by Abbas (Magnum) and Melisa Teo, who traveled for 3 years documenting the spiritual traditions of Buddhism, Shamanism and Hinduism.

It's an interesting contrast of styles: the black & white photojournalistic photographs of Abbas and Melisa's more abstract, color-filled and blurry images. The contrast between the sharp black & white imagery by Abbas and the colorful intentional (or not) photographs by Melisa shows that there is ample room for either and both disciplines and styles.

I liked Abbas' relaxed conversational narration, probably honed through years of public speaking, while Melisa's is somewhat stilted and strained. Photographers usually make awful narrators...but Abbas did his very well.

The exhibition is held in Singapore from September 1 to 23rd, 2011. Further details are available here.

A few days ago, I expressed my POV that travel photographers could learn from fashion photographers, and that having such a two-way exchange of ideas, concepts and techniques is a good thing for both types of photography. It's the same for the styles espoused by Abbas and Melisa.

In a part of the narration, Abbas tells us that he would photograph a wide angle documentary image of the Ganges, while Melisa would choose a small flower floating on it...the whole versus the part. Similarly, on some of my photo workshops, I had the experience when shooting alongside photographers who have a fashion or interior design background...they see less in documentary style and more in abstract terms....or the whole versus the part.

Thursday, August 25, 2011

POV: A Leica S2 As A Travel Camera?


A recent post on The Luminous Landscape seems to have prompted my good friend Eric Beecroft to suggest I should get one. Perhaps made half seriously half jokingly...but his suggestion got me thinking and now prompted this POV.

I tend to distill all such suggestions by using a return on investment yardstick. Pretty basic, huh? According to B&H, the price of the S2 is $23,000 (the more posh S2-P is $28,000), while a Leica Summarit-S 35 mm f/2.5 ASPH Lens is $6,500 and a Leica Summarit-S 70mm f/2.5 ASPH Lens is $5,000. The grand total for this hardware is $34,500...excluding tax.

So what do I get for a capital investment of over $35,000? Well, The Leica S2 is said to provide imaging quality of digital medium-format, and create 37.5 megapixel files. It produces 72.5 MB RAW or 106.6 MB JPG files, which open to images over 16 x 24" at 300 dpi.

There's no question that the Leica S2 is a phenomenal camera, but in my view its price point and technical specifications are aimed at commercial photographers, not travel photographers. The return on an investment of that magnitude for travel photographers is tough to justify (unless they're one of the celebrity travel photographers), especially in the current industry doldrums.

The most expensive Canon is the EOS-1Ds Mark III SLR Digital Camera with a price tag of ("only") $7,000 and it provides 21.1-megapixel full-frame images. The more modest Canon 5D Mark II, and a favorite of travel photographers, has a comparative paltry price tag of $2,500...half the price of the Leica Summarit-S 70mm lens mentioned above.

"the computer sez no"

A travel photographer would need to sell 10 photographs at $250 each to recoup the investment in a Mark II, and almost a 100 photographs just to recoup the investment in the Leica S2. Would the S2's image quality do that for me?

Simplistic? Sure...there are many other tangible and intangible factors that also enter in this logic. That being said, this is more or less how CFOs and CEOs decide on capital expenditures.

So in reply to Eric's suggestion: "the computer sez no", as the famous line in Little Britain* goes.

* A classic British comedy tv series.

Wednesday, August 24, 2011

The GoLite Shangri-La 5-A Change in Perspective

As you guys know, for quite some time now, I have been using a tarp and bivi shelter setup. Specifically, I’ve been using a US MSS bivi as my main shelter, combined with a DD 10x10 tarp for added shelter, and so that I have a good work space in case it rains during the day.

One downside to this system has been that during winter, or other times of high wind and cold, I have no protective barrier during the day. At night everything is fine once I get into my bivi and sleeping bag, but during the day, a tarp (if pitched to allow a good amount of room underneath) does little to stop the cold wind.

I have been reluctant to use a tent because I hate feeling enclosed in a bubble. I don’t want to limit the things I can do inside the shelter, such as cooking or carving, if I have to spend the day sheltered there.

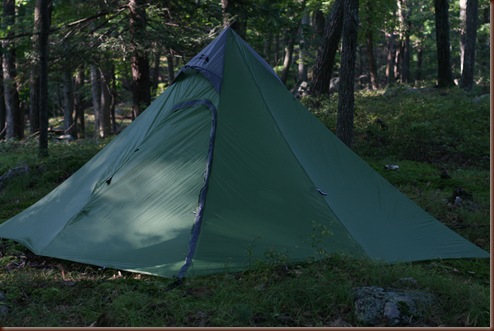
I decided to try a compromise-a floor less tent. There are several good design currently on the market, including the Titanium Goat 6.5 and the Kifaru 4 Man Tipi. I loved the idea of the design, but didn’t like particular things about each shelter. I did a few comparisons, and decided that for a much lower price, I can get many of the same advantages with the now out of production, but still available GoLite Shangri-La 5. More specifically, I decided to go with the Shangri-La Flysheet. The tent also has in internal “nest” comprised of a floor and mosquito netting, but that is not what I was looking for.

120 

Here is how the three tents stack up: 

  GoLite Shangri-La Flysheet Titanium Goat 6.5 Kifaru 4 Man Tipi
Weight 2 lb 14 oz 4 lb 2 oz 5 lb 5oz
Cost $350.00 $650.00 $850.00
Height 6.1 ft 6.5 ft 6.5 ft
Floor Area 90 sq. ft. 102 sq. ft. 103 sq. ft.
Material 15 Denier Ripstop Nylon 1.3 oz Silicone Coated Nylon Coated Paraglider Fabric
Stove Vent/Boot No Yes Yes

As you can see from the numbers, for very similar dimensions, the Shangi-La offers a much cheaper and lighter weight alternative.

The design of the three shelters seems almost identical. The materials seems very similar, and the designs appear to be about the same.

126

One notable difference is that the Titanium Goat 6.5 and the Kifaru 4 Man Tipi have a stove vent. That is an small area in the wall of the tent there the material has been cut out and replaced with a fire/heat resistant boot. That way a stove pipe can be threaded to the outside of the tent. The Shangri-La does not come with this option, but you can actually purchase the boot from Titanium Goat and install it on the Shangri-La.

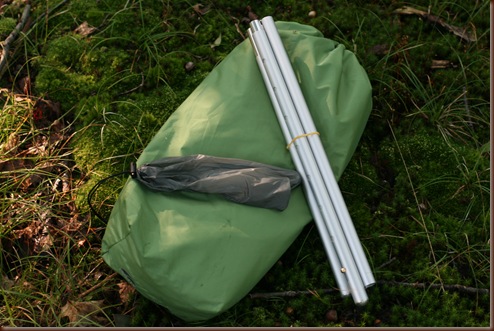
So, I decided to same myself a lot of weight and money, and go with the GoLite Shangri-La 5. One important this to note is that out of the 2 lb 14 oz of the tent, the stakes and center poll weigh 1 lb 1 oz. That means that if you make your own poll and stakes in the field from wood, the pack weight of the shelter would be 1 lb 13 oz. I can’t say I’m upset about that.

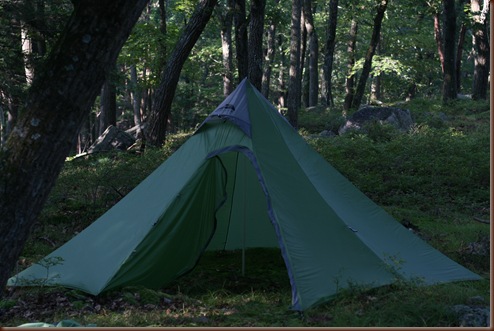
The Shangri-La 5 is a good size shelter. It is advertised as being able to fit 5 people, but that is very, very optimistic. It is not huge, but two people and four dogs should easily fit in there for the night.

160

The shelter is large enough and vented well enough so that you can use a stove inside. I would not try to build a fire inside because a spark may jump and melt a hole through your wall. The fabric is coated with fire resistant compounds, but I would not risk it.

164

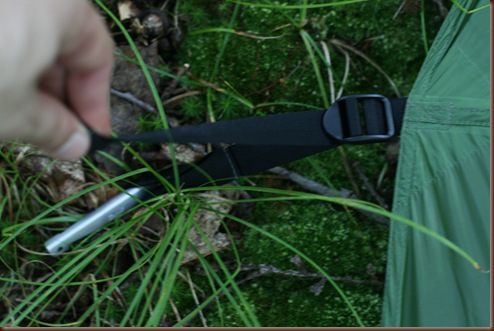
The amount of ventilation can be adjusted by lifting and lowering the sides of the shelter with the adjustable straps.

143

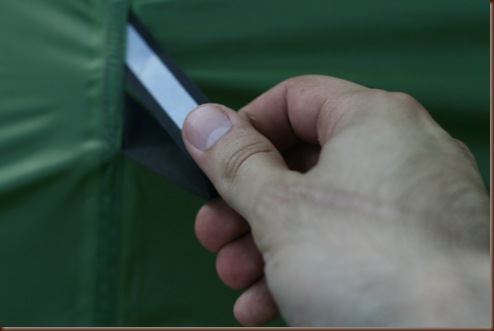
There are also additional loops on the walls, that you can attach to stakes with string for added stability in very bad weather.

151

Even with all of its components, the shelter packs down to a fairly small size.

095

Since I just got the shelter, this will not be a full review. I just wanted to keep you guys updated on the changes I am making to my shelter system. I will still be keeping my bivi, but it is my hope that this shelter will provide better wind protection while still allowing me to cook and do other projects while inside the shelter.